407-248-1481
QuoteWerks Knowledgebase Topic (Article ID 6502)
Peachtree - Peachtree Company ID Field Blank in Drop DownThis information applies to : |
Article ID 6502 Created/Updated July 17, 2019 Category Peachtree
|
|
| Issue:
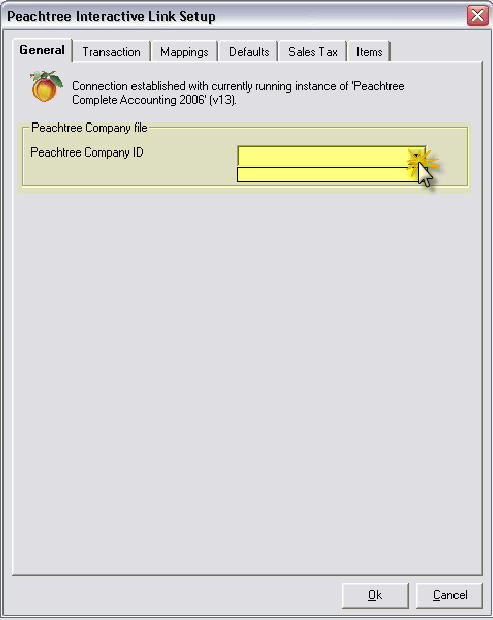
When selecting the Peachtree Company ID in the Peachtree Link Setup, the drop down list is either blank or showing the incorrect Company Files. 
Cause: The Peachtree INI file for your installation of Peachtree is pointing to the incorrect DataPath. The DataPath should point to your network path if you are on a network installation of Peachtree. Solution: With each edition and version of Peachtree, there is a different ini file typically located in the C:\Windows\System32 folder in pre-2010 versions, and 32-bit Windows: C:\Program Files\Common Files\Peach or for 64-bit Windows: C:\Program Files (x86)\Common Files\Peach. 1. Look for the [Lib] section, look for the line that reads: "DATAPATH=" 2. Copy this line, paste it below the existing line, and place a semicolon in front of the original line. 3. Change the new DataPath to point to your network location such as: "DATAPATH=P:\PEACHW" Below is a listing of known INI files ( From Peachtree KB ): Peachtree Filename Version 2015: Peachtree220.ini Version 2014: Peachtree210.ini Version 2013: Peachtree200.ini Version 2012: Peachtree190.ini Version 2011: Peachtree180.ini 2008 Peachtree Quantum - Accountants 2008 PTXA150.ini Peachtree Quantum 2008 PTX150.ini Peachtree Premium Accounting - Accountants' 2008 PPAA150.ini Peachtree Premium Accounting - Non-Profits 2008 PPAN150.ini Peachtree Premium Accounting - Manufacturing 2008 PPAM150.ini Peachtree Premium Accounting - Distribution 2008 PPAD150.ini Peachtree Premium Accounting - Construction 2008 PPAC150.ini Peachtree Premium Accounting 2008 PPA150.ini Peachtree Complete Accounting 2008 PCW150.ini Peachtree Pro Accounting 2008 PAW150.ini Peachtree First Accounting 2008 PFA150.ini 2007 Peachtree Quantum - Accountants' 2007 PTXA140.ini Peachtree Quantum 2007 PTX140.ini Peachtree Premium Accounting - Accountants' 2007 PPAA140.ini Peachtree Premium Accounting - Non-Profits 2007 PPAN140.ini Peachtree Premium Accounting - Manufacturing 2007 PPAM140.ini Peachtree Premium Accounting - Distribution 2007 PPAD140.ini Peachtree Premium Accounting - Construction 2007 PPAC140.ini Peachtree Premium Accounting 2007 PPA140.ini Peachtree Complete Accounting 2007 PCW140.ini Peachtree Pro Accounting 2007 PAW140.ini Peachtree First Accounting 2007 PFA140.ini 2006 Peachtree Premium Accounting - Accountants' 2006 PPAA130.ini Peachtree Premium Accounting - Non-Profits 2006 PPAN130.ini Peachtree Premium Accounting - Manufacturing 2006 PPAM130.ini Peachtree Premium Accounting - Distribution 2006 PPAD130.ini Peachtree Premium Accounting - Construction 2006 PPAC130.ini Peachtree Premium Accounting 2006 PPA130.ini Peachtree Complete Accounting 2006 PCW130.ini Peachtree Accounting 2006 PAW130.ini Peachtree First Accounting 2006 PFA130.ini ---- Please Note: If you have issues changing the DataPath, please contact Peachtree Technical Support and/or refer to the following Peachtree Article : How do I change the datapath and/or program path in Release 2004 and higher? Question How do I change the datapath and/or program path in Release 2004 and higher? Answer To change the datapath and/or program path of Peachtree Release 2004 and higher, you need to uninstall and reinstall Peachtree. In prior releases you could edit the ini file to accomplish this, but starting in Release 2004 you will need to uninstall and reinstall, following the steps below. If you are having a problem with following these steps please contact Customer Support. Uninstall Peachtree 2004 or higher Make sure that you have logged on to the computer with Administrative privileges. Peachtree must be closed on all computers before you begin. If any errors occur during these steps, write them down and call Peachtree Customer Support. 1. Insert your Peachtree program CD for version 2004 or higher. After a short time, you should see a setup menu. 2. From this menu, select Peachtree Accounting. 3. After the Installshield loads select the radio button for Remove and click Next. 4. You will be asked "Do you want to completely remove the selected application and all of it's features?" Click OK. 5. When the uninstall has completed (length of time for this can vary), you have successfully uninstalled. Reinstall Peachtree 2004 or higher 6. Insert your Peachtree program CD for version 2004 or higher. After a short time, you should see a setup menu. 7. From this menu, select Peachtree Accounting. 8. After the Installshield loads, click Next. 9. Select the radio button appropriate to the License Agreement and click Next. 10. On the next screen, you will see three options. Of these three options, select Advanced Setup. (Note: For purposes of clarity, you will be selecting Advanced Setup. This is not usually necessary for future Peachtree Installations). Click Next. 11. On the next screen you will need to specify your Destination Folder and your Company Folder. 12. Your Destination Folder should show the following (not case sensitive) C:\Program Files\Peachtree 13. Place a check mark in the box titled "Place my company accounting data in a different folder". 14. Make the Company Folder text box read whatever your datapath should be. If you are not yet sure what your datapath should be, contact Peachtree Customer Support for assistance. 15. You can either browse to this directory using the Browse button, or you can type it in. 16. Click Next. On the next screen all components will have a check mark next to them. Unless you were instructed to uncheck any of these, leave them all checked and click Next. 17. On the following screen, you will leave everything as it is and click Next again. 18. After the installation has completed (allow up to 45 minutes to complete), uncheck any boxes that are checked and click Finish. You have just installed Peachtree. If you were instructed to perform these steps on more than one computer, repeat the above instructions at each computer. If on a network, it is a good idea to make sure these other computers have proper mapping. If you are unsure, see a local support technician or your network administrator for assistance. If applicable: when you have finished, you may need to re-register your Peachtree. The latest tax service and updates related to Peachtree will also need to be reinstalled. |
||
|
|
©1993-2026 Aspire Technologies, Inc.
407-248-1481 (9am-5pm ET M-F)
Please Wait...
