From the Document Items tab, you can add items to, edit items on, or delete items from your quote. See Working with Document Items for more information.
Navigating the Grid
The "grid" in QuoteWerks refers to the DocumentItems tab and the various fields, rows, and columns.
Navigating through the grid is very simple. Simply click on a field and the cursor will appear in the cell at the position you clicked. You can use the HOME button on the selected field to move the cursor to the beginning of the field or the END button to move the cursor to the end of the contents of the field.
|
Also, when the cell text is selected and you press SHIFT-LEFT or SHIFT-RIGHT it will de-select all the text and position the cursor at the beginning or end of the cell respectively. Separately, when editing in the cell, holding the SHIFT key while using the LEFT or RIGHT arrow key will select the text in the respective direction. Pressing CTRL+RIGHT ARROW will move the cursor to the beginning of the next word and similarly, pressing CTRL+LEFT ARROW will move the cursor to the beginning of the previous word. If the entire contents of the cell is selected, this will not happen.
You can move between fields on the grid using the [Tab] button to move across fields (just like Excel) or use the [Enter] button to move vertically instead.
Important: The changes that you type into a cell are not committed until you Tab or Click into a different cell. For example, if you type information into a cell and then Print, the information you just typed will not appear. |
Selecting Rows
To select an entire row, click on the selector for the row (the blank space next to the row). This will highlight the entire row so you can edit the line attributes, move the row, etc.
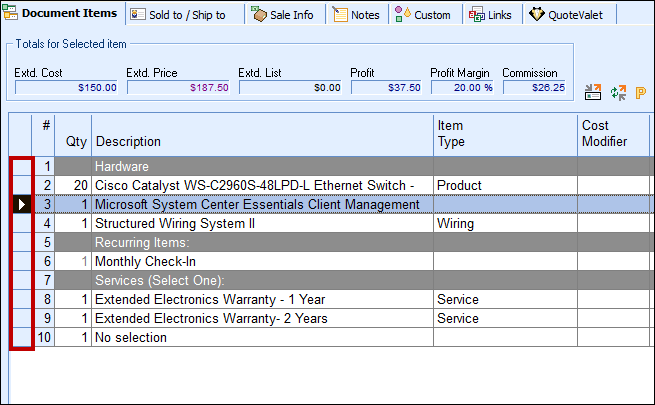
Hold down CTRL when clicking on the row selector to select multiple rows.
|
|---|
Customizing Columns
You can customize the columns of the Quote Workbook’s Document Items tab, as well. You can change which columns are displayed, the title of each column, and in which order the columns appear under View > Customize Columns. For details, see Customizing QuoteWerks.
View the sorting columns topic to view information on sorting by data in a specific column.
See Setting the Shipping Amount.
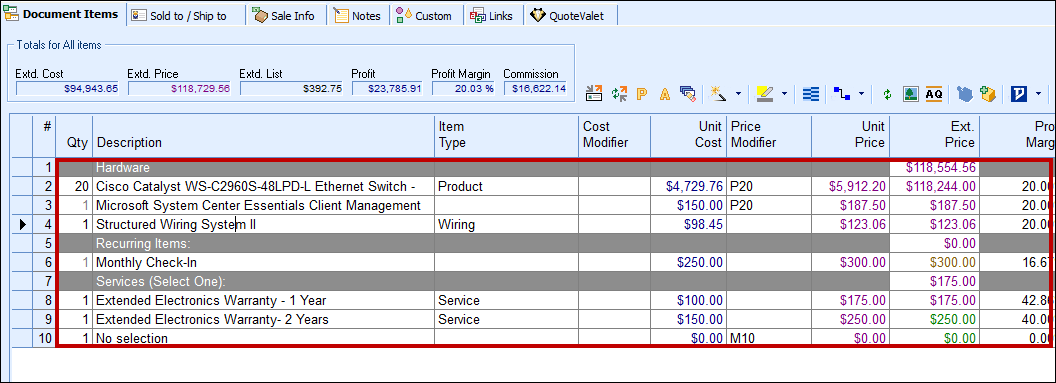
Totals for Selected Items Display
Located above the list of line items on the Document Items tab is the Totals Bar:

When you select line item(s), this Totals Bar will display the Extd.Cost, Extd. Price, Extd. List, Profit amount, gross Profit Margin, and Commission amount only for the lines selected. If no line items are selected, these values will reflect the total of all items on the quote. If the Profit amount/Profit Margin are negative, they'll be displayed in red.
There are also several access-right settings that control which of these displays are visible. Using the QuoteWerks security features, you can individually hide the Profit, Profit Margin, Extd. Cost, and Commission values. To do this, click the Utilities -> User Maintenance menu, select a user from the list, click Edit, and select the appropriate CannotSeeSelTotals option(s) for the user under the Access tab.
|
Alternate Currency Totals Display
If you’ve selected an alternate currency for this quote under the Quote Workbook’s Sale Info tab, you’ll see a push button for the selected alternate currency in the Totals Bar:
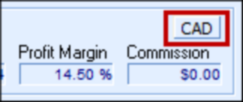
When you click this button, the totals will be displayed in the alternate currency rather than the base currency.
Totals Display / Deposit Required
Located below the list of line items on the Document Items tab are the Totals Display and Deposit Required function.
USA Formatted Totals Display

For USA customers, the totals for all the line items in the document will be displayed for Subtotal, sales Tax, Shipping amount, Total, and the Recurring amount, if any, which is set under line attributes. See Line Attributes for more information.
Canadian Formatted Totals Display

For Canadian customers, the totals for all the line items in the document will be displayed for SubTotal, GST Tax, PST Tax, Shipping amount, Total, and the Recurring amount, if any, which is set under line attributes. See Line Attributes for more information.
If you require a deposit from your customer, you can set an amount by clicking  next to the Deposit Required display at the bottom of the Quote Workbook. This will bring up the Deposit Required window, allowing you to set the deposit for this quote.
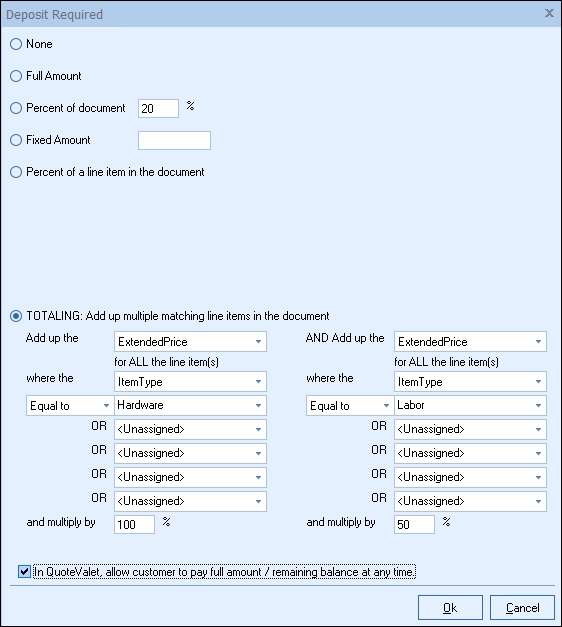
The Deposit Amount for each document will use this default setting. The deposit amount can be set to None, the Full Amount of the document, a Percentage of [the] document total, a Fixed Amount, or based on a line-item amount (like a subtotal or percent of a line item’s extended price). Typing an amount into the Percentage of document field will auto-populate the Fixed Amount field with the actual amount related to the percent you entered. You can still change the Fixed Amount field manually, for rounding purposes or otherwise.
You can also select Percent of a line item in the document which will calculate the deposit based on that single line item. Additionally, by using the Add up multiple matching line items in the document option, you can choose to add up multiple line items where the item type, manufacturer, manufacturer part number, vendor, vendor part number, and custom text fields match the criteria specified. You can add up items that are "Equal to", "Not Equal to", "Contains", or "Begins with". This enables you to set the deposit for only a certain amount of line items. So if the quote contains a few items that require a deposit but others that don’t, you can easily calculate the deposit automatically using this summary filter.
You can also set the deposit to charge a percentage on the item type in order to calculate the deposit for 100% of the products, but only 50% of the labor or installation. This provides a lot of flexibility in using the deposit to collect the exact amount you need to move forward.
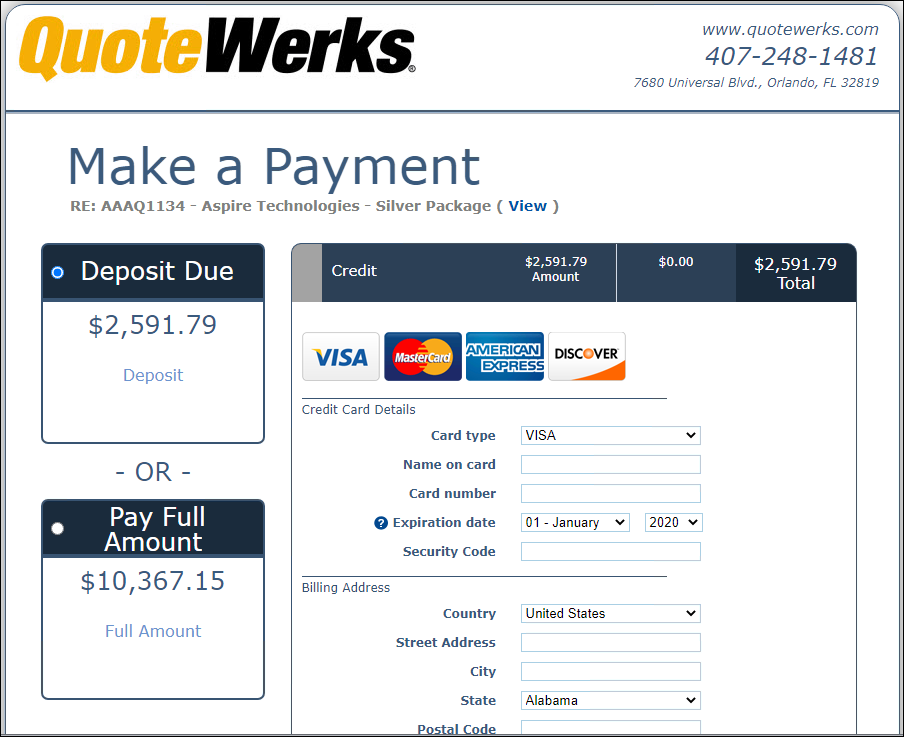
The Deposit Required feature can be used in conjunction with QuoteValet, allowing a customer to put down a deposit when they accept the quote. For more information on payments through QuoteValet and accepting deposits, see QuoteValet.
Note: You can set a default Deposit Required under the Tools -> Options menu > Documents tab. |
In QuoteValet, allow customer to pay full amount / remaining balance at any time.
This checkbox will let your customer pay the deposit of the document or choose to pay the full/remaining balance of the document at any time when using QuoteValet. They can still pay the deposit amount first, but would also be able to pay the full amount instead. It simply gives them the option. They can also come back to the payment screen to pay off the remaining balance after the initial deposit payment at any time.
Related Topics: