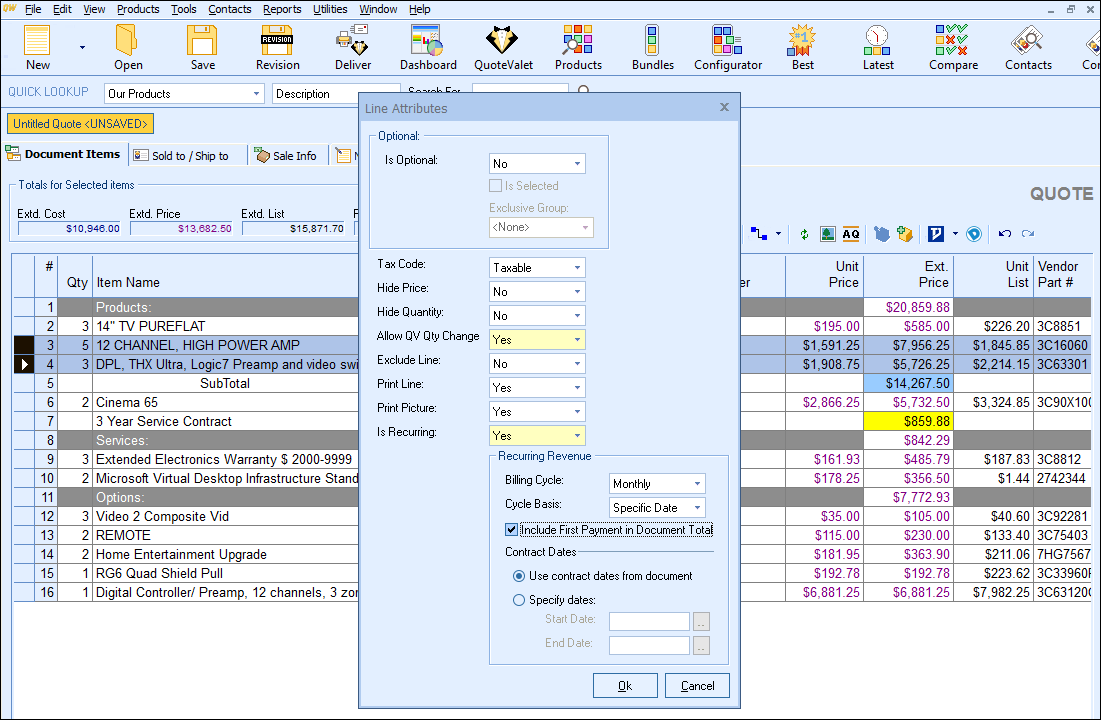
Certain line types, such as Product/Service and Comment, can have several different attributes. These attributes are displayed in the status bar at the bottom of the Quote Workbook when the line item is selected.
To view or modify a line item's attributes, select the item under the Document Items tab and then either select the Edit -> Edit Line Attributes... menu or double-click on the item's record selector ( ):
):

To apply attributes and properties to multiple line items simultaneously, hold down the [Ctrl] key on your keyboard and select all the line items you'd like to set the same attributes for. Then, select the Edit -> Edit Line Attributes... menu. Any attribute that is not typically set or used will be highlighted yellow in the line attributes.
You can also use the [Ctrl] + [A] keyboard shortcut to select all the items. |
|
|---|
|
|---|
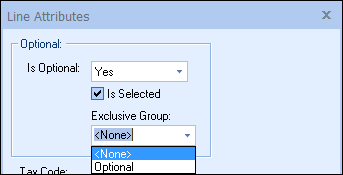
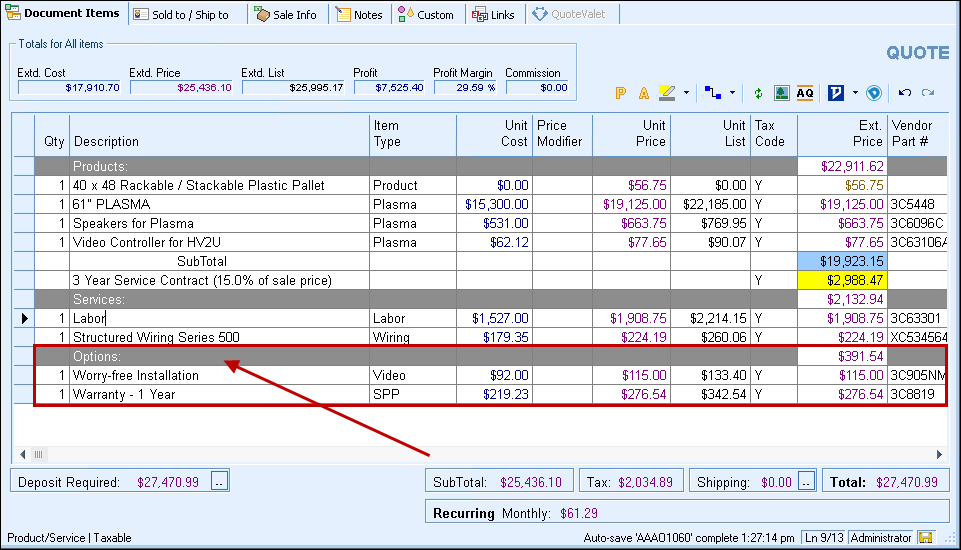
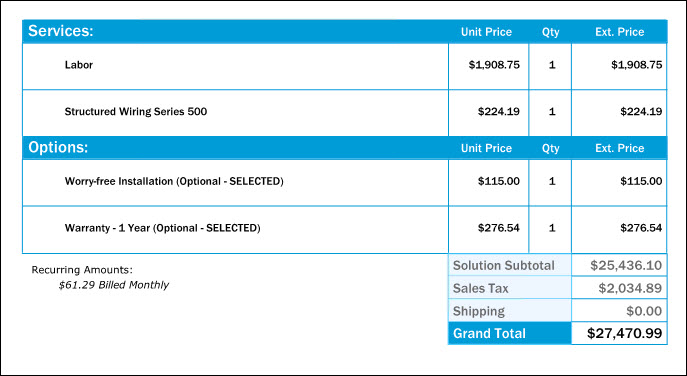
If you set this line attribute, the selected line item will be an option that will print with its price, but the price will not be included in the calculation of the total price. In addition, the default phrase (optional) will appear next to the line item in the description section on the quote. This default phrase can be modified.
Additionally, an optional item can be marked as Is Selected. This flags an item as an option, but the item will be selected and included in the quote total. This is particularly useful with QuoteValet, as you can present one or more options to your customer and preselect the option(s) you recommend.
You can also add items as an Exclusive Group. When set, this attribute will assign that item or items into the same exclusive group. However, only one of the items in the exclusive group will be selected. In QuoteValet, this will create a radio button for all items that are part of that exclusive group and enable the customer to select one of the items in the group. This attribute is very useful as users could specify between multiple grouped options such as "Group Option 1" and "Group Option 2". Selecting one of those items will deselect the other options that are part of the same exclusive-option group. This is an easy way to provide the user with options such as "good, better, best".
For example, if you had three warranty items on your quote (1 Year, 2 Year, 3 Year) and you wanted the customer to select one of those, but not have the option to select none of them, you would use this feature.
1) Highlight the items.

2) Right-click and select Line Attributes. Change the "Is Optional" attribute to Yes, check the box for "Is Selected". This will ensure one of the items will be pre-selected for the customer. Next, type into the Exclusive Group box and give the group a name. In this example we will simply call it "Warranty". Change any additional attributes as needed and click ok.
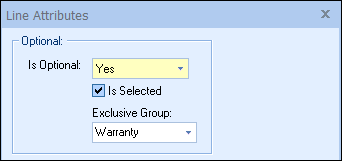
3) Those three items on the document are now in an exclusive group and a radio button will automatically appear in QuoteValet. The customer can select one of those options on their quote.

|
Additionally, you can specify the Is Optional attribute (shown in the screen shot above) when using optional items in Bundles and Configurations, as well as on the Edit Product window.
|
|---|
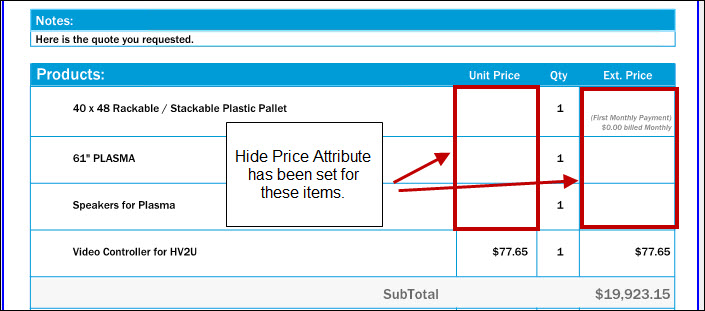
If you set this line attribute, the price for the line item will not be printed, but will be involved in all calculations. This is useful when you don't want a customer to see the breakdown price of each individual item. Once you select this line attribute, all the line item's properties except the Quantity and Description become gray; the gray cells denote the information that won't be printed.
When you print the quote, the line item will appear but the List Price and Extended Price will be blank. However, the price of the line item will be included in the total.
If you set the Hide Quantity attribute, the quantity of the line item will not be printed on the quote layout or QuoteValet. This is very useful if you have multiple options on a quote that have group header lines and you don’t want to show the quantity for those header lines. This is also useful for users who provide options on a QuoteValet quote and want to give the customer an option not to pick any of the given options.
Allow QV Qty. Change
If you set the Allow QV Qty Change attribute, your customers will be able to change the quantity of this specific item on the QuoteValet documents. This is very useful if you want to give your customer the ability to adjust how many of a certain item they need to purchase.
If you set the Tax Code attribute, sales tax will be calculated for this item. You must make sure that, on the Sale Info tab, either the tax rate is set in the Tax Rate field or the Sales Tax cell for that line item and Total Tax field shows $0.00.
If you set the Exclude Line attribute, the line item will not be printed or involved in any calculations. Once you select this line attribute, all the line item's properties become gray; the gray cells denote the information that won't be printed.
The Exclude Line attribute can be very useful. For example, let's say you're quoting some stereo speakers to a customer, and the customer is interested in three different brands. Using the Exclude Line attribute, you can add all three of the speaker brands to your quote as line items. Since you are not going to sell your customer all three of the brands, you can set the Exclude Line attribute on two of the three line items. This way, only one of the brands would be displayed on the printed quote.
If the customer then wanted to know the price of the other speaker brands, you can easily remove the Exclude Line attribute from the other brands and then print the quote again. The real advantage here is that you didn't have to go searching for the speaker brands again in your product database, because you already did the research and added them all to your quote when you first created it. In summary, the Exclude Line attribute allows you to have all the options or possible line-item combinations in a single quote, where they can be manipulated easily.
If this attribute is set, the line item will not be printed, but will be included in calculations. This feature is most useful when you want to add a line item to your quote that is included in the total without displaying it to your customer. For example, if your quote includes a miscellaneous item like a package of screws, you can set the Print Line attribute to “No” for this line item to prevent your customer from seeing this insignificant detail.
Pictures can be associated with products in the product database (for details see Setting Up Native Products and Services). If this attribute is set the picture associated with the product contained in this line item will be printed with the line item. Please note, in order for the picture to be printed, you need to have inserted the DocumentItems->&Picture field into the print layout that you are using to print the document.
For details on inserting fields into print layouts, see Printing and Customizing Document Layouts.
Using this attribute, you can specify that a line item is recurring (for example, monthly service fees).
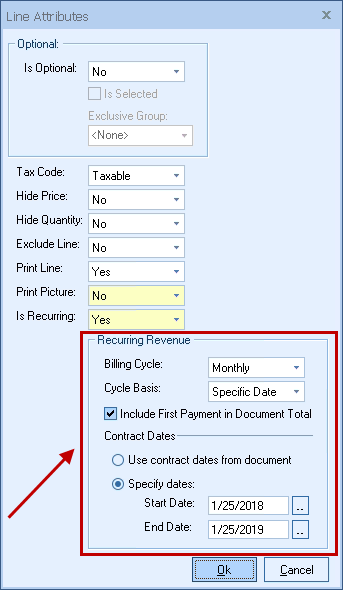
Billing Cycle
Here, you can set whether the line item recurs on a "Weekly", "Monthly", "Quarterly", or "Annual" cycle.
Cycle Basis
Here, you can set how the billing due date is determined. For example, if the start date of the recurring item is March 22 and this option is set to "Start of Cycle", the billing date will begin on April 1 and the amount will be due on the first of every following month (May 1, June 1, July 1, etc). If you set the cycle to be a "Specific Date", the billing cycle will begin on April 22 and the amount will be due on the 22nd of every following month (May 22, June 22, July 22, etc).
Include First Payment in Document Total
Often, when selling something with a monthly fee, you'd require the first month’s payment up front. Checking the Include First Payment in Document Total box will do that. If you don't check this box, then the recurring charge will not be included in the quote subtotal.
Typically, you'd just specify the start and end dates for each line item that is set as recurring. Of course, if there are multiple monthly recurring line items with the same start and end dates, it is easier to just choose the option to Use contract dates from document. This way, if the customer accepts but says they don't want it to start for another two months, you can just update the start and end date once under the Sale Info tab of the Quote Workbook.
Recurring revenue items can easily be included in management reports, so you can see, for example, how much Monthly revenue is forecasted based on these recurring revenue items. You can also filter the reports to see when various monthly contract periods are ending, so that you can contact your customers for renewals, etc.
The Recurring Billing Cycle, Recurring Start Date and Recurring End Date columns are all available under the Document Items tab. You also have access to all this recurring information in the print layout using the following Document Items tab fields:
•&LineAttributeIsRecurring
•RecurringBillingCycle
•RecurringFirstPaymentIncluded
•&RecurringRevenueWeekly
•&RecurringRevenueMonthly
•&RecurringRevenueQuarterly
•&RecurringRevenueAnnual
There are also DocumentHeader macro fields available for use:
•&RecurringRevenueWeeklySubtotal
•&RecurringRevenueMonthlySubtotal
•&RecurringRevenueQuarterlySubtotal
•&RecurringRevenueAnnualSubtotal
For details on inserting fields into print layouts, see Adding Database Fields to a Layout.