Creating or Updating a Sales Opportunity
When saving a document, the “Create/Update Sales Opportunity” checkbox will appear on the Save window:
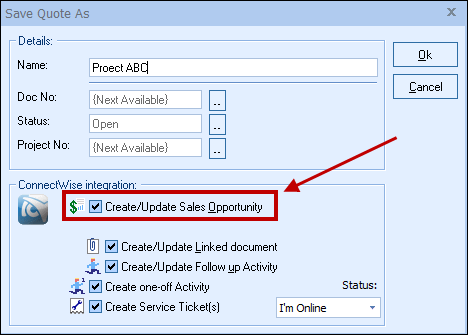
This option will create or update a ConnectWise opportunity or attach to an existing opportunity in ConnectWise.
|
Opportunity
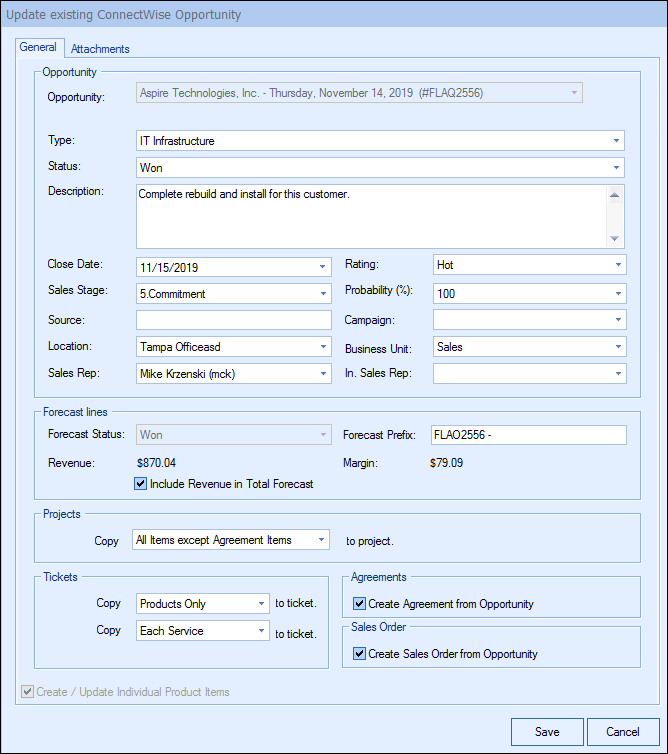
Once you have pressed the [OK] button from the File -> Save or File -> Save As window, the “Create/Update ConnectWise Opportunity” window will appear, enabling you to enter or adjust information about the opportunity such as the Opportunity Name, Type, Status, Description, Close Date, Rating, Sales Stage, Probability %, Source, Marketing Campaign, Location, and Business Unit:
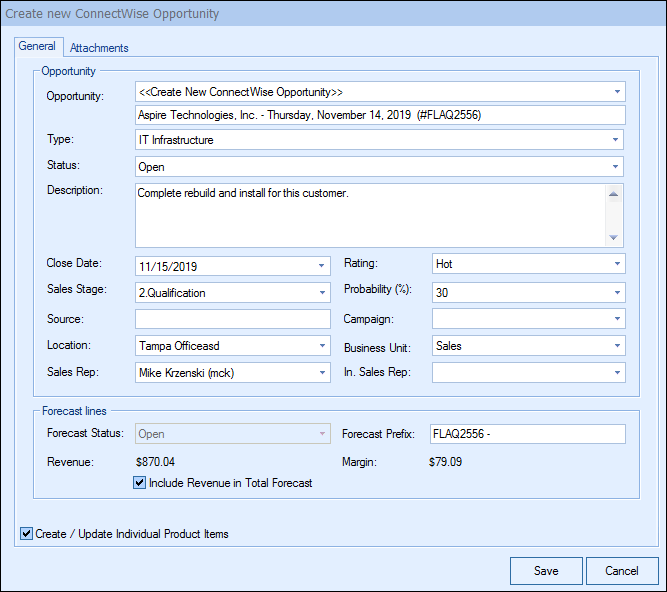
The Opportunity drop down will contain a list of all existing ConnectWise opportunities associated with the ConnectWise contact record on the Sold To / Ship To tab in QuoteWerks. If you have not already created a new opportunity for this quote, here you can select an existing opportunity to update with the current quote’s information.
You can also set the Primary Sales Rep when creating/updating the opportunity as well as the internal sales rep.
At the bottom of the opportunity window the user can also select to create / update the individual product items. Unchecking this box will not create the products in the opportunity. This can be useful if you don’t want to send over products to ConnectWise that you might not ever sell if you don’t win the deal. This will also enable users to only create products that have been sold when converting the quote to an order or invoice. This setting can be defaulted under Contacts-> Setup Contact Manager-> ConnectWise-> Opportunity Setup-> Products.
|
|---|
Forecast Lines

This section corresponds to information on the Forecast tab of the ConnectWise Opportunity. The “Forecast Status” field corresponds to the “Status” field on the Forecast tab in ConnectWise and the “Include Revenue in Total Forecast” option corresponds to the “Include” checkbox on the Forecast tab in ConnectWise.
The Forecast Prefix field is unique to the QuoteWerks integration with ConnectWise and is particularly useful as it makes it easy to identify which QuoteWerks quote is associated with each Forecast Line on the Forecast tab.
While the Prefix will default to the quote number, it can be modified manually as needed either during the creation of the Opportunity or within ConnectWise.
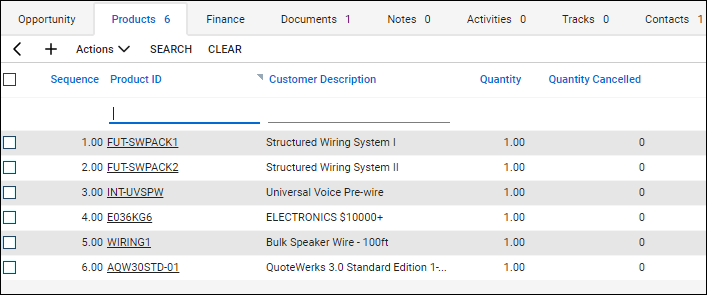
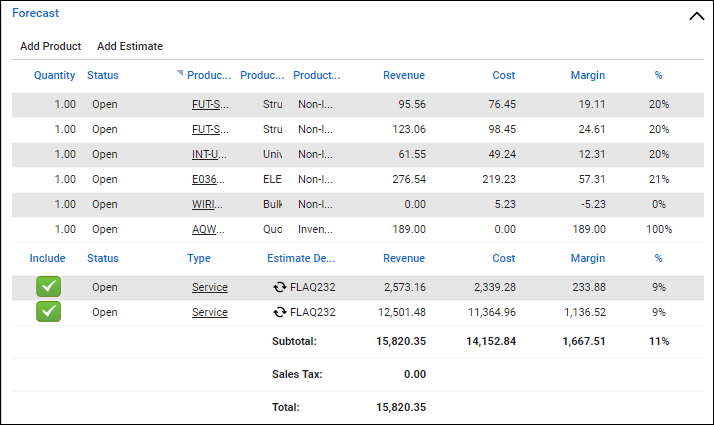
Additionally, all products from the QuoteWerks quote are written over to ConnectWise under the Products tab in the opportunity. If a negative quantity has been specified for a product, the negative quantity will also be reflected when written over to the Products tab. When creating the items in ConnectWise, if the manufacturer does not exist for a product, it will automatically be created in ConnectWise when written to the opportunity. Manufacturer part numbers will also be added to the manufacturer part number field in ConnectWise as well.
If an item from QuoteWerks contains a vendor in the "Vendor" field in QuoteWerks and it exactly matches the vendor name in ConnectWise, the vendor name will be populated to the ConnectWise procurement item. If an exact match is not found, then the vendor name will not carry over.
Adding File Attachments to an Opportunity
You can attach files to the Documents tab of the ConnectWise Opportunity through the Create/Update ConnectWise Opportunity window:
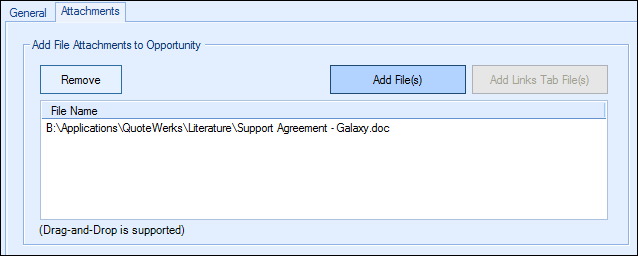
You can either select a file using a file selection dialog [Add File(s) from Disk], or choose a file that is already linked to the quote under the on the Quote WorkBook [Add File(s) from Links Tab]. This is really useful for attaching a PDF version of the quote to the ConnectWise Opportunity. Having a PDF version of the quote is an advantage because anyone can then view the quote – they do not have to have QuoteWerks installed on their machine to view the quote. You can attach multiple PDF files to the opportunity, so you can easily attach the customer proposal, and a no frills plain vanilla version for the service technicians to follow, and basically anything else you could want.
Opening a Selected Opportunity
The Create/Update Opportunity window includes an easy way to view an already linked opportunity in QuoteWerks. By clicking on the  button, users can view the opportuntiy directly in ConnectWise. This is very useful if you are attaching a new quote to an existing opportunity and you want to make sure it is the correct opportunity before saving it.

Unlinking an Opportunity
If you accidentally attached a quote to the wrong opportunity in ConnectWise, you can use the  button to remove the link.:

All entries relating to the QuoteWerks Quote will be removed from the ConnectWise opportunity, including: Forecast lines, products listed under the Products Tab, services listed under the Services Tab, the document attachment under the Documents Tab, and the Call activity under the Activities Tab. This button will only be displayed when updating an existing opportunity, so if you realize you made a mistake, choose to update the opportunity, and then at that point, use this button to unlink it.
By creating opportunities in ConnectWise, ConnectWise can generate pipeline reports. This feature helps you estimate your cash flow. If you already have an opportunity for this quote, it will automatically update the existing one to reflect changes you have made to the quote.
QuoteWerks claims ownership of ConnectWise opportunities that were created or updated from within QuoteWerks. It is not recommended that you manually make changes to the opportunity from within ConnectWise as these changes may be overwritten by QuoteWerks when QuoteWerks is updating the ConnectWise opportunity.
UserSettings\UserConfig\ForecastCloseDate={+30) UserSettings\UserConfig\ForecastProbability=90 UserSettings\UserConfig\CallBackDate={+7) UserSettings\UserConfig\CallBackTime={+30) The codes for ForecastCloseDate and CallBackDate will schedule the date for today’s date plus 30 days or plus 7 days; the code for CallBackTime schedules the call time for the current time plus 30 minutes. |
This option will mark the Forecast in the ConnectWise opportunity as Won. This option is only available when the QuoteWerks document being saved is an ORDER or INVOICE. A quote is converted to an order or invoice using the File -> Convert to Order/Invoice menu. When this menu is selected, the “Update Existing ConnectWise Opportunity” window will be displayed if the QUOTE has been linked to a ConnectWise opportunity:
The Opportunity status can be changed to whichever opportunity status you want to select. It will use the default status set in the setup if you do not change it.
This “Won” Forecast can originate in several ways. If there is an existing opportunity for this quote, QuoteWerks will convert the Forecast line on the existing opportunity to “Won”. If there is no existing opportunity and this option is checked, then QuoteWerks will create a new opportunity, attach the Forecast and make it as “Won”. Last, if the “Won” Forecast already exists on an opportunity and you have made some changes to the order/invoice, then the “Won” Forecast record will be updated.
Once you have clicked the [Ok] button from the File -> Save, or File -> Save As window, the “Update Existing ConnectWise Opportunity” window will appear, enabling you to add new or modify existing information for the opportunity. The Status and Probability fields will not be modifiable when working with a “Won” opportunity, however.
Creating ConnectWise Projects when Converting a Quote to an Order
On the bottom of the Opportunity window there is an option to create a Project in ConnectWise Manage from this selected opportunity. You'll have the option to create a project from all the items in the opportunity, all items except Agreement items, only phased groups, or none of the items. This will convert these items into a new or existing project.

Creating ConnectWise Agreement when Converting a Quote to an Order
On the bottom right of the "Update Existing ConnectWise Opportunity" window, there is an option for QuoteWerks to create an Agremeent in ConnectWise from this selected opportunity. Checking this box will link all the products, notes, and documents from the ConnectWise Opportunity to the new Agreement in ConnectWise. This option will only be available when you are converting a quote to an order in QuoteWerks to complete the opportunity. If you need to create a new item, that is not setup as an agreement in ConnectWise, see the Sending Agreements to ConnectWise topic for proper mappings.

Creating ConnectWise Sales Orders when Converting a Quote to an Order
On the bottom right of the "Update Existing ConnectWise Opportunity" window, there is an option for QuoteWerks to create the Sales Order in ConnectWise from this selected opportunity. Checking this box will link all the products, notes, and documents from the ConnectWise Opportunity to the new Sales Order in ConnectWise. This option will only be available when you are converting a quote to an order in QuoteWerks to complete the opportunity.
In QuoteWerks, the ConnectWise SO number will be saved into the QuoteWerks line items that were added to the ConnectWise Sales Order in the SONumber column in QuoteWerks. This is very useful as this is a searchable column in the Open Document window and the QuoteWerks Purchasing Window.

Creating Service Tickets when Converting to an Order
Additionally, at the bottom of the update opportunity window users will be able to copy the products and services associated with the opportunity to a ticket. Users will have the options to copy products only, services only, products and services, or each service item to their own ticket.

|
|---|
Once users have made their selections to create their tickets the Create/Update New Service Ticket window will open and enable the users to make their selections for the specific ticket (Product, Services, Each Service, All Line Items, etc.):

Users will also be able to link a single ticket with the opportunity in ConnectWise by checking the box. Additionally, if a ticket already exists and you wish to link with the existing ticket, simply click on the ticket drop-down menu and select the ticket you would like to link to. Once you have linked to a ticket, you will see a new icon is available ( ) which will let you view this ticket in ConnectWise.
This window will continue to open until all tickets have been created.
As tickets are created for each line item in the quote, the ConnectWise ticket number will be written into the TicketNumber column under the Quote Workbook's Document Items tab. This number is very helpful later, when you're in the Purchasing window. Here, you'll be able to easily see all the items that need to be purchased for any particular service ticket. And after the items are ordered, you can also review Real-time order status for all items on a particular ticket number.
See Creating ConnectWise Service Tickets for more information on service tickets, and Creating Purchase Orders in ConnectWise for more information on