This section covers menu commands in the layout designer.
File Menu
This menu contains the following selections:
Save
Use this command to save the changes to the current layout file. If a file name has not yet been assigned, this option will allow you to enter the file name. You can also use the shortcut key Ctrl–S to access this command.
Save As
Use this command to save a layout template to a new file. This option is used to create a copy of the exiting layout. The editor will prompt you for the name of the new layout file.
Save & Close
Use this command to save the changes to the current layout file and close out of the Layout Designer.
Save & Preview
This command enables you to make a change to a layout, then click on it which then performs the combined tasks of saving the layout, closing the layout, and previewing the layout all at once. After the preview window is closed, QuoteWerks then re-opens the layout in the layout designer so that you can continue making changes. This menu item is not available when editing report layouts.
Printer Setup
The default printer is automatically assigned to a new layout. Use this option to select a different printer from the list of installed printers. This option also allows you to change the printer parameters for the selected printer. The selected printer and the corresponding setup parameters affect the width, height and orientation (portrait or landscape) of the printer output.
Close
Use this command to close out of the Layout Designer. You can also use the shortcut key Ctrl–W to access this command.
Edit Menu
This menu contains the following selections:
Undo
Use this function to undo the editing command. You can only undo 1 command.
Cut, Copy, Paste
These commands allow you to copy an item or a selection of items to the clipboard and paste the items from the clipboard to the current layout.
Delete
Use this option to delete 1 or more currently selected items.
If the current section is being deleted, the program asks for your confirmation before the deletion. All items within the section are also deleted.
Label
Once the label has been selected in the layout, use this option to edit the text in a label.
Formula Field
Once the formula field has been selected in the layout, use this option to edit a formula field.
Snap to Grid
There is an invisible grid of rows and columns in the layout. When using the “Snap to Grid” option, whenever a field is moved, the field will be automatically aligned with the nearest grid lines. You can also adjust the spacing of the grid; reducing the size will allow for more exact adjustments to the field placement. When you do not use the “Snap to Grid” option, it can become difficult to line up fields, since you have to manually position them.
Insert Menu
This menu allows you to insert a field into the layout. This option will display a list of fields to choose from, based on their location. When you select a field, the layout editor displays a cursor rectangle. Use the mouse to position the cursor rectangle and click any mouse button to place the field into your layout. The new field is created where the cursor rectangle is positioned.
The submenu allows you to insert seven types of fields:
Data Field
When this option is selected, you can insert data fields from the DocumentHeaders table, the DocumentItems table, the QuoteWerks Application, etc. In print layouts (not report layouts), you can also insert data fields from your Contact Manager. In report layouts (not print layouts) you can insert fields from Product Databases.
System Field
When this option is selected you can insert system fields which contain system dependent information such as calendar date, time, page number, record count, total page count, and paragraph break field.
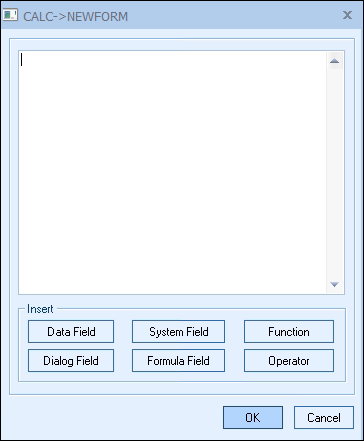
Formula Field
When this option is selected it allows you to create a new formula. The first step in creating a formula is giving it a descriptive name. Once the formula name has been created, the next step is to build your formula in the CALC->(Formula Name) window. Review Formula Field Concepts for details.
|
Dialog Field
When this option is selected it allows you to insert a dialog field. A dialog field must be created before it can be selected from the Insert Dialog menu. Dialog fields are created by selecting the Report -> Dialog Fields -> New menu. Details on creating a dialog field can be found in the explanation of the Report Menu later in this topic.
Label
Use this option to insert a new label into your print layout. Once added, you can double-click on the label to edit the text.
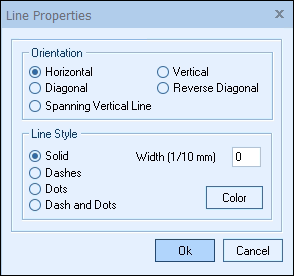
Line
Use this option to insert a new horizontal line into your print layout. Once added, you can double-click on the line to change the line properties:
Picture
Use this option to add a picture file to the layout, such as your company logo. Any picture file added into a Detail Section will repeat every time a line item is printed; as such, you will typically only add a picture file to a Header or Footer Section of the print layout. See the “Including pictures of quoted items in the quote” section of this chapter for information on how to include pictures in a Detail Section that change for each line item. To remove a picture from the layout, right-click on it and select Delete.
|
Format Menu
This menu contains the following selections:
Font
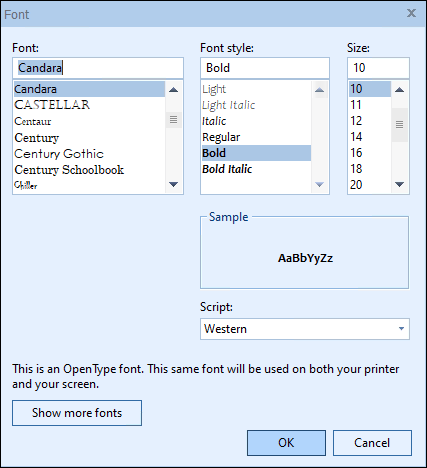
This menu enables you to change the font settings of a selected item(s), including font, font style and font size.
Conditional Font
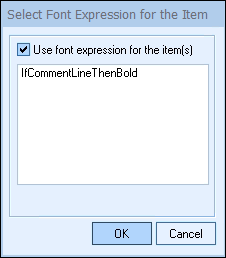
When this menu is selected, it enables you to apply a Conditional Font to 1 or more selected objects on the layout. Further details on the creation and use of Conditional Fonts can be found under Report Menu later in this topic.
Alignment
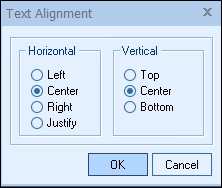
When this menu is selected, it will enable you to change the alignment settings for the text of the selected field(s). This option does not align the field arrangement; please see Arrange Menu below for details on that functionality.
Borders
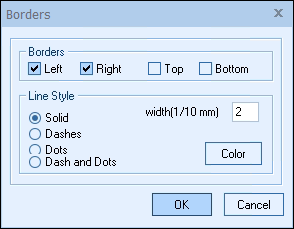
This menu will enable you to place borders around the selected fields(s).
Background Color
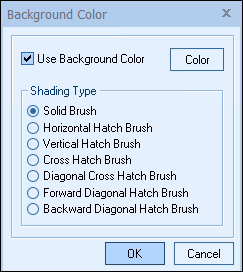
This menu will enable you to apply a background color to the selected object(s).
Click on the [Color] button to open the Color window. This window will allow you to choose a color from a palette, or define your own color.
Center in Report
When this option is selected it will center the selected field(s) in center of the layout.
Set as Active Style
When this option is selected it allows you to select a field in your layout and set it as the Active Style. The active style properties can include, but are not limited to; font, font size, background color, alignment, and font color. Once you have set the Active Style, you can select any field(s) and select Format -> Apply Active Item Style and it will change the field properties to the Active Style.
Please note, after you have “Set the Active Style,” it is saved to the print layout you are editing. When you return to the layout, it will still be active.
Set as Field Properties
When this option is selected it allows you to select a field in your layout and set it as the Active Field Properties. The active field properties can include, but are not limited to; word wrapping, number of decimal places, etc. Once you have set the Active Field Properties, you can select any field(s) and select Format -> Apply Active Field Properties and it will change the field properties to the Active Field Properties.
Please note, after you have “Set the Active Field Properties,” it is saved to the print layout you are editing. When you return to the layout, it will still be active.
Apply Active Item Style
Use this option to apply the “Active Style” format to a selected field(s). The “Active Style” format is set using the Set As Active Style menu.
Apply Active Field Properties
Use this option to apply the “Set as Active Field properties” properties to a selected field(s). The “Field Properties” format is set using the Set As Field Properties menu.
Field
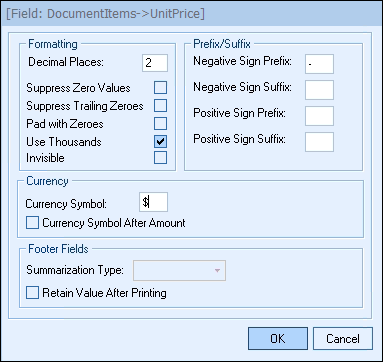
This menu will enable you to change the field properties of the selected data field.
|
Decimal Places
This option determines the number of digits to the right of the decimal point.
Suppress Zero Values
This option suppresses the printing of a field if it contains a zero value.
Suppress Trailing Zeroes
This option suppresses the trailing zeroes for a decimal field. For example, values 1.30 and 1.00 would print 1.3 and 1 respectively.
Pad with Zeroes
This option will insert zeros before the field if the field value occupies less space than specified by the field width.
Use Thousands
When this option is set, numbers will be displayed with a thousands separator like “4,579” versus “4579”.
Invisible
You can specify an ‘invisible’ attribute for an item. When this attribute is set, the item is visible only when editing the layout. This option can be useful for creating intermediate formula fields that you do not wish to display on the layout.
Prefix and Suffix for Negative Values
This option determines how a negative value is displayed. For example, if you wish to enclose a negative value in parentheses, specify ‘(‘ for the prefix and ‘)’ for the suffix (do not include the ‘ symbols). If you instead want to show the negative symbol in front of the value, enter - for the prefix and nothing for the suffix.
Prefix and Suffix for Positive Values
This option determines how a positive value is displayed. For example, if you wish to enclose a positive value in square brackets , specify ‘[‘ for the prefix and ‘]’ for the suffix (do not include the ‘ symbols) . To display a plus sign in front of the number, you could set the prefix to “+” (do not include the ‘symbols’). If you do not wish to show any symbol for a positive value, leave the prefix and suffix fields blank.
Currency Symbol
This option allows you to specify a currency symbol ($, €, Rs, Fr, etc) for fields that represent money. Also, you can specify whether the symbol is before or after the amount. The currency symbol for many fields such as Unit Cost, Extended Price, and Subtotal are automatically set by QuoteWerks using the Regional settings of the Windows Control Panel. For these fields, this option will be ignored. This option is mostly used for formula fields since QuoteWerks does not automatically set the currency symbol for these fields.
Footer Fields
These options are discussed in Field Concepts.
Retain Value After Printing
Normally, when a total (or average, maximum, minimum, count) is printed, the internal accumulator is cleared to start the next iteration of the section from zero. However, if you wish to print the running totals, select the checkbox for this option.
Label Properties
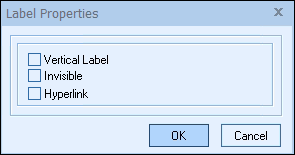
When this menu is selected it will allow you to change the field properties of the selected label.
Vertical Label
This option will change the horizontal label to vertical.
Invisible
This option changes the label attribute to be invisible.
Hyperlink
This option will change the selected label contents to a hyperlink when in print preview mode. The text however, must be in valid hyperlink format starting with “http” or “www.” (for example: https://www.quotewerks.com)
Line
This menu enables you to change the line properties of the selected line.
Section
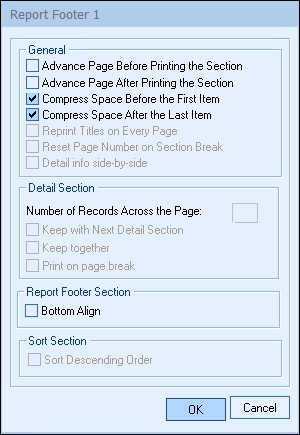
When this menu is selected, it will allow you to change the section properties of the selected section. Some of the options listed are only available when working with specific section types, such as a Report Footer or Detail Section.
Advance page Before Section
This option advances the printing to the next page before printing the data for the current section. For example, you may use this option to print a footer section on a new page.
Advance page After Section
This option advances the printing to the next page after printing all the items for the current section. For example, you may use this option to advance to the next page after printing the totals for the current section.
Compress Space Before the First Item
This option instructs the layout editor not to print the additional space between the beginning of the section line and the topmost item.
Compress Space After the Last Item
This option instructs the layout editor not to print the additional space between the ending line of the section line and the bottom most item.
When a section includes a word wrapped field, this option is particularly useful to suppress the additional space when a memo field is smaller than the field rectangle. This technique allows you to create a wrapped field rectangle big enough to accommodate the biggest possible memo field data, but also have it automatically compressed when the text is smaller than the field rectangle.
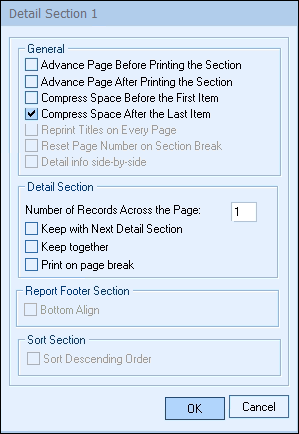
Number of Records Across
This option enables you to print multiple records across the page in the form of columns. This parameter can be used to print labels, as two or more addresses can be printed in 1 row. It cannot be used with header or footer sections and is only available on layouts that contain a single detail section.
Keep with Next Detail Section
This option forces the selected Detail Section to print on the same page as the next Detail Section. So, this ensures that this detail section and the detail section after it will always be on the same page together.
For example, if in Detail Section 2 a product discount deadline was displayed, you would always want that printed together with the product, because if it printed separately on the next page, there is a good chance that it would not be seen.
Keep together
This option will check to see if the text of a section can be printed entirely on 1 page. If it cannot be printed entirely on 1 page, it will be printed on the next page.
Print on page break
When checked, this detail section will print at the bottom of the page immediately after the last detail section that printed on that page. This is useful for “capping” the bottom of each page with for example some lines that close out the bottom of a grid (if your layout design has vertical and horizontal lines).
Bottom Align
This option is only available for Report Footers. This is used to force the section down to the bottom of the page (after the last detail section) even if the detail ends in the middle of the page.
Section Menu
This menu contains the following selections:
New
Use this option to add a new section to the Print Layout.
Delete
Use this option to delete a selected section. If you delete a section, all fields in the section will be deleted.
Sort Field
This option is used to sort the data by the specified field; it is only available in reports and only if you have a Sort Header section selected.
Break Field
This option is also only available in reports and only if you have a Sort Header section selected. A break field is used to determine the section break for a Sort Header. When you insert a new sort section, the print engine automatically creates the break field to be the same as the sort field. Typically, the break fields should be the same as the sort field; however, using this option, you can specify a different break field if needed. Unlike the sort fields, a break field can also be a formula field.
Filter
Use this option to specify a filter for the selected section. A section filter can be used to print specified information if it meets the criteria of the filter. For example, you could create a section filter to only print the Description and Extended Price if the Line Type is equal to a Subtotal.
Report Menu
This menu contains the following selections.
Named Fonts
A named font is used inside a font expression. Consider a Named Font called ‘BOLDFONT’ which represents an ‘Arial’ typeface, 12 point size, and the Bold attribute. Once named, it can then be used in a Conditional Font which can then be applied to a field.
New
This option allows you to create a new Named Font. Once you have created the Named Font, it will open a Font window in which you can select the Named Fonts’ attributes. An example of a Named Font could be “BOLDFONT”, as mentioned above.
Edit
This option allows you to edit a Named Font.
Delete
This option allows you to delete a Named Font.
Conditional Fonts
This option will allow you to name and create a conditional font statement. As an example, if you wanted the Extended Price field to be Bold whenever the value was less than $10, you would create a Named Font which has the Bold setting activated (such as “BOLDFONT”). You would then a use the following formula in the Conditional Font:
.if.documentitems->extendedprice<10.then."BOLDFONT"
The formula reads: “If the Extended Price field is less than $10, use the Named Font BOLDFONT instead of the default font.” The default item font will then be used when the subtotal amount is exactly $10 or greater than $10.
New
This option allows you to create a new Conditional Font.
Edit
This option allows you to edit a Conditional Font.
Delete
This option allows you to delete a Conditional Font.
Dialog Field
This option will allow you to create new dialog fields, modify existing dialog fields, or to delete a dialog. Dialog Fields are used to prompt the user for data when the layout is printed. The dialog field can also be included in the layout. To add a new Dialog field, click on Reports-> Dialog Fields-> New:
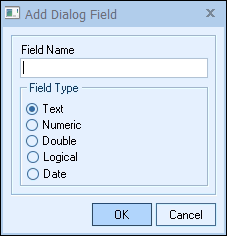
For example, you may create two dialog fields, BEGIN_DATE and END_DATE to prompt the user for the beginning and ending dates of a lease term. You can then print these two dates on the report header by inserting them in proper places.
New
This option allows you to create a new Dialog Field. The user is prompted for the name of the dialog field and the field type.
Once a dialog field is created, it can be inserted in the layout by using the Insert Dialog Field option from the Insert menu. A dialog field can appear in more than 1 place within a layout. When a dialog field is selected, the status area shows the dialog field name with a ‘DLG->’ prefix.
Edit
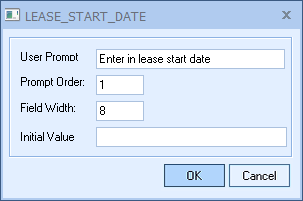
This option allows you to modify the parameters of a dialog field. You can modify the following parameters for a dialog field.
User Prompt
The text to be displayed to prompt the user for the data.
Prompt Order
When more than 1 dialog field is used, this option allows you to enter the order in which the fields should be prompted.
Field Width
Width of the field given in number of characters.
Initial Value
This allows you to set the default value of the field.
Delete
This option will allow you to delete a dialog field. The window will show a list of dialog fields. The chosen field is deleted from the dialog box. Please note the dialog field must be deleted from the layout, and removed from any formula expression, before it can be deleted from the dialog table.
Size
This menu will enable you to adjust the spacing for fields in a section.
Expand Horizontally
Use this menu to create horizontal spaces by moving the items horizontally. For example, consider three items, A, B, and C placed horizontally. If you need to insert a new item between the items A and B, you can use this function to create the desired space between these two items and place the new item in the newly created space. To move the items B and C towards the right, create a selection rectangle after item A and select this menu. Make sure the width of the selection rectangle matches the distance you want items B and C to move to the right (note that the selection rectangle does not need to include the items to be moved). All items on the right of the selection rectangle and within the vertical space spanned by the selection rectangle will be moved.
Expand Vertically
Use this option to create additional vertical space by moving the items downward. For example, consider three items, A, B, and C placed vertically. If you need to insert a new item between items A and B, you can use this function to create the desired space between these two items and place the new item in the newly created space. To move items B and C downward, create a selection rectangle below item A and select this menu. Make sure the height of the selection rectangle matches the distance you want items B and C to move downward (note that the selection rectangle does not need to include the items to be moved). All items below the selection rectangle will be moved.
This option also expands (vertically) the current section by the height of the selection rectangle.
Compress Horizontally
Use this option to delete extra horizontal space by moving the items horizontally. For example, consider three items, A, B, and C placed horizontally. You can use this function to bring the items B and C closer to the item A. To move items B and C towards the left, create a selection rectangle after item A and select this menu. Make sure the width of the selection rectangle matches the distance you want items B and C to move towards the left (note that the selection rectangle does not need to include the items to be moved). All items on the right of the selection rectangle and within the vertical space spanned by the selection rectangle will be moved.
Compress Vertically
Use this option to delete vertical space by moving the items upward. For example, consider three items, A, B, and C placed vertically. You can use this function to bring the items B and C closer to the item A. To move items B and C upward, create a selection rectangle below item A and select this menu. Make sure the height of the selection rectangle matches the distance you want items B and C to move upward (note that the selection rectangle does not need to include the items to be moved). All items below the selection rectangle will be moved.
This option also shrinks (vertically) the current section by the height of the selection rectangle.
Options…
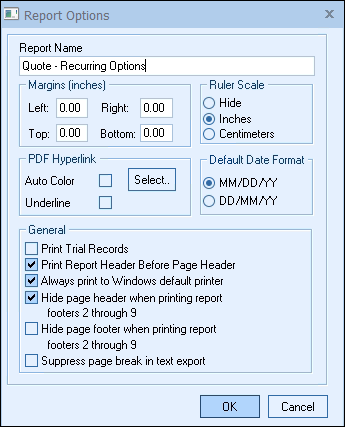
This option will allow you to modify the following layout parameters.
Report Name
You can use this option to change the layout name.
Margins
You can specify top, bottom, left, and right margins. The layout editor applies the margin information to the selected printer (see Printer Setup) to calculate the layout width. The layout width is indicated by the top ruler.
Default Date Format
This option lets you specify the default date format.
Ruler Scale
Use this option to show the ruler in inches or centimeters. You can also turn off the ruler.
Print Trial Records
This option is only used when printing to dot-matrix printers and is especially useful when printing labels. It allows the user to adjust the label on the printer before actually printing the labels. This feature is not available when printing to laser printers.
Print Report Header Before Page Header
If this option is checked, then the Report Header section will print above the Page Header section.
Always print to Windows default printer
If this option is checked, when previewing the layout, the default printer defined in Windows will be used; otherwise, the printer that you specify by selecting the File -> Printer Setup menu will be used.
Hide page header when printing report footers 2 through 9
If this option is checked, when report footers 2 through 9 are printed, the page header section will not be printed (normally the page header section is printed at the top of every page).
Hide page footer when printing report footers 2 through 9
If this option is checked, when report footers 2 through 9 are printed, the page footer section will not be printed (normally the page footer section is printed at the bottom of every page).
Suppress page break in text export
From a preview window, when selecting File -> Save As, and choosing the Text file format option, if this option is checked, page breaks will be suppressed.
Arrange Menu
This menu is available when right-clicking on the layout. These commands help you position the layout objects accurately. Select a set of objects to be arranged and one of the following functions from the menu.
Align
The align menu provides commands for aligning fields on your layout. Select the fields to align by holding the CTRL key and left click on each field individually.
Top Edge
Use this option to horizontally align the top edge of the items to the top edge of the last item selected.
Bottom Edge
Use this option to horizontally align the bottom edge of the items to the bottom edge of the last item selected.
Left Edge
Use this option to vertically align the left edge of the items to the left edge of the last item selected.
Right Edge
Use this option to vertically align the right edge of the items to the right edge of the last item selected.
Center Line (Horizontal)
Use this option to align the horizontal center line (imaginary) of the items to the center line of the last item selected.
Center Line (Vertical)
Use this option to align the vertical center line (imaginary) of the items to the center line of the last item selected.
Spacing
The spacing menu provides commands for making sure that the fields on the layout are evenly spaced from each other.
Same Horizontal Separation
Use this option to place the selected items horizontally at an equal distance from each other. The inter-item distance is equal to the distance between the first two leftmost items.
Same Vertical Separation
Use this option to place the selected items vertically at an equal distance from each other. The inter-item distance is equal to the distance between the first two topmost items.
Sizing
The sizing menu provides commands for making sure that the fields on the layout are of the same width and height.
Set Even Width
Use this option to change the width of the selected items to the width of the last item selected.
Set Even Height
Use this option to change the height of the selected items to the height of the last item selected.