Formula fields enable you to create advanced customizations in your print layouts. This section covers some of the basics of formula design.
Adding Formula Fields into the Layout
Besides being able to insert data fields, label fields, and other objects into the print layout, you can also create customized formula fields. Creating formula fields is an advanced topic. We will cover a few basic examples here.
Example 1
Often, you may offer your customer a discount on an item. As a result you would like to show your customer the discount dollar amount that they received. Use the following steps to create a “DiscountAmount” formula.
Step 1: Select Insert -> Formula field from the menu, and enter a name for the formula field. The name can be anything that you would like, although it cannot contain spaces. Typically, you will name the formula field to convey the purpose of the formula field. We will call ours “DiscountAmount”. After you have named the formula field, the formula builder window will appear.
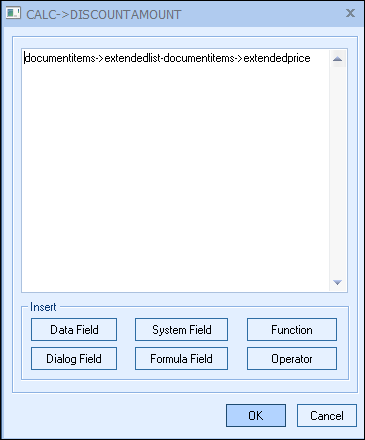
Step 2: Click on the [Data Field] button, then choose ExtendedList from the DocumentItems table. This will display the text “DocumentItems->ExtendedList” in your formula builder window.
Step 3: Click on the [Operator] button, then choose the minus symbol (-) from the list. This will display “DocumentItems->ExtendedList-“ in your formula builder window.
Step 4: Click on the [Data Field] button, then choose ExtendedPrice from the DocumentItems table. This will display the text “DocumentItems->ExtendedList-DocumentItems->ExtendedPrice” in your formula builder window.
Step 5: Click on the [Ok] button, and then place the formula on the print layout. This formula you would want to place into a Detail Section of the layout. Now your layout will display the discount amount (ie.$10.00) that your customer has received for the item.
Example 2
Based on the example above you may want to have a total discount dollar amount displayed in your quote. This way the customer can see the total discount amount they received. Use the following steps to setup the formula.
Step 1: Select the formula you created in the previous example (DiscountAmount), then right click on your mouse and select copy.
Step 2: Paste the copy of (DiscountAmount) into the ReportFooter1 of the layout.
Step 3: Double-click on the copied formula (discountamount2). Under Footer Fields, select summarization type of “Total”.
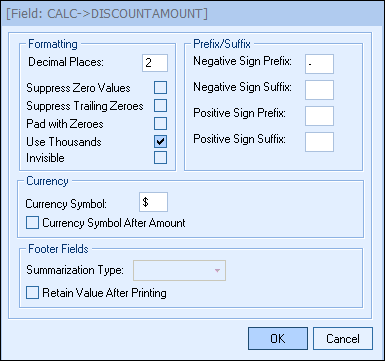
Step 4: You can also specify the number of decimal places, as well as the currency symbol you would like to display.
Step 5: Click on the [OK] button. Now, when you use this layout it will display the discount amount for each line item and it will display the total discount amount received for all items.
Example 3
Many times you may want to print a value (text or numeric) if a field is equal to, not equal to, greater than, or less than something. This is better known as an “If/Then/Else” statement. For example, if a sale amount is greater than $1000.00, then the customer will receive free shipping, otherwise the shipping amount is $25.00.
Use the following steps to create an “If/Then/Else” formula.
Step 1: Select Insert -> Formula field from the menu, and enter a name for the formula field. The name can be anything that you would like, although it cannot contain spaces. Typically, you will name the formula field to convey the purpose of the formula field. We will call ours “Shipping”. After you have named the formula field, the formula builder window will appear.
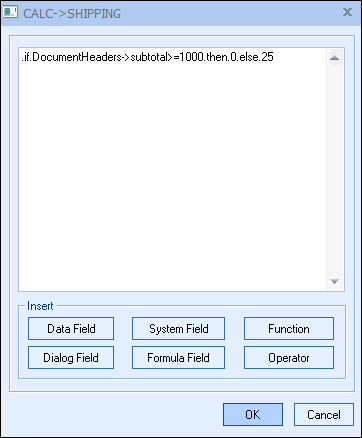
Step 2: Click on the [Operator] button, and choose the .if. operator. This will display the text “.if.” in the formula builder.
Step 3: Click on the [Data Field] button and then choose the Subtotal field from the DocumentHeaders table. This will display the text “.if.DocumentHeaders->SubTotal” in your formula builder window.
Step 4: Click on the [Operator] button, chose the greater than or equal symbol >= and then type 1000. This will display the text “.if.DocumentHeaders->SubTotal>=1000” in your formula builder window.
Step 5: Click on the [Operator] button, and choose the .then. operator. This will display the text “.if.DocumentHeaders->SubTotal>=1000.then.” in your formula builder window.
Step 6: Type the number 0. This will display the text “.if.DocumentHeaders->subtotal>=1000.then.0”in your formula builder window.
Step 7: Click on the [Operator] button, and choose the .else. operator. This will display the text “.if.DocumentHeaders->subtotal>=1000.then.0.else.”
Step 8: Type the number 25. This will display the text “.if.DocumentHeaders->subtotal>=1000.then.0.else.25”:
Step 9: Click the [Ok] button, and then place the formula on the print layout. Double click on the formula field to set some properties for it. Typically, you would set the Decimal Places to 2, and the currency symbol, then click the [Ok] button. Now, when you print the layout, if the subtotal amount of the document is greater than or equal to $1000.00, the shipping value will be zero. If the subtotal value is less than $1000.00, the shipping value will be $25.00. Please note, this formula does not update the “shippingamount” field.
“If/then/else” formulas are very flexible and powerful. Here are some additional examples:
On a commission report, you could create a formula that calculates a Sales Rep’s commission as $100 if they sell an item greater than $1000.00, or calculates their commission as $25 if the item is less than $1000.00:
.if.documentheaders->subtotal>1000.then.100.else.25
In a Conditional Font, you could create a formula that will apply a Named Font to a field only if the line item is an Optional Item:
.if.documentitems->&lineattributeoption.then.”BOLDFONT”
If you wanted to calculate the shipping amount based on the Subtotal, so that the shipping amount is $15 if the Subtotal is less than $500, $10 if the Subtotal is between $500 and $1000, or free if the Subtotal is greater than $1000, you would insert (or “nest”) an IF statement within another IF statement:
.if.documentheaders->subtotal<500.then.15.else.((.if.documentheaders->subtotal>=500.and.documentheaders->subtotal<=1000.then.10).else."Free")
Example 4
Often, addresses are only 2 lines in length, but since QuoteWerks provides 3 address lines, sometimes you will end up with a blank line (where the suite # should be) between the first and third line of the address. We can use a formula field to eliminate that blank line using the following steps:
Step 1: Select Insert -> Formula field from the menu, and enter a name for the formula field. The name can be anything that you would like, although it cannot contain spaces. Typically, you will name the formula field to convey the purpose of the formula field. We will call ours “FullAddress”. After you have named the formula field, the formula builder window will appear.
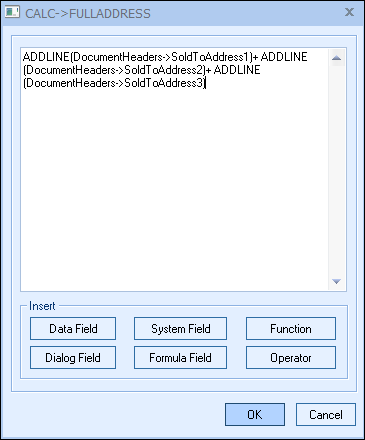
Step 2: Click on the [Function] button, and choose the AddLine(string) function. This will display the text “ADDLINE(“ in the formula builder.
Step 3: Click on the [Data Field] button and then choose the SoldToAddress1 field from the DocumentHeaders table. This will display the text “ADDLINE(DocumentHeaders->SoldToAddress1” in your formula builder window.
Step 4: Type a parenthesis symbol ). This will display the text “ADDLINE(DocumentHeaders->SoldToAddress1)” in your formula builder window.
Step 5: Click on the [Operator] button, and choose the plus symbol +. This will display the text “ADDLINE(DocumentHeaders->SoldToAddress1)+” in your formula builder window.
Step 6: Repeat this process starting at step 2 for SoldToAddress2 and SoldToAddress3. After SoldToAddress3, do not add a plus symbol. When completed, the formula builder window will display the formula “ADDLINE(DocumentHeaders->SoldToAddress1)+ ADDLINE(DocumentHeaders->SoldToAddress2)+ ADDLINE(DocumentHeaders->SoldToAddress3)”.
Step 7: Click on the [Ok] button, and then place the formula on the print layout. Now, when you print the layout, you will notice that even if there is no Address 2 line, a blank line will not be printed.
In this particular formula example, since the result of the formula will contain multiple lines of text, right click over the formula field after you have placed it on the print layout and choose the Format menu. Then click on the “Variable numbers of lines” checkbox.