|
|
|---|
Using the Product Import Wizard
The Product Import Wizard is used to import tab delimited, comma delimited, or any other specified delimited text file.
Some of the vendors that you purchase products or services from may provide you with a file that contains their price list. These files are typically formatted in many different file formats. QuoteWerks can import files that are in a delimited text file format such as tab-delimited, comma-delimited (CSV), or user specified character delimiter. If the file that your vendor has provided you with is formatted in a format other than the format that QuoteWerks supports, you can still import your data into QuoteWerks; you will just need to prepare the data first.
|
QuoteWerks import product information from a variety of generic sources.
To start the Import Wizard, select the Products -> Import Wizard menu.
Step 1: Selecting the Source
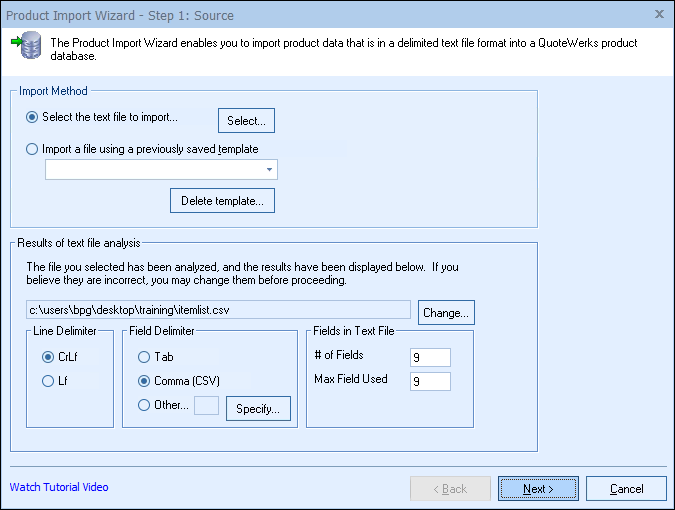
Select the text file to import...
You will begin the process by selecting the text file that you wish to import. You can select the file manually, or select a template that you saved from a previous import.
After you have selected the text file, QuoteWerks will attempt to determine if it is comma or tab- delimited. If a comma or tab delimited text file is not detected, QuoteWerks will then default the delimiter type to the “Other…” option where you can manually specify a different delimiter.
QuoteWerks will also attempt to determine how many columns of data there are in the text file. QuoteWerks will display the delimiter and number of columns that it found on this window. If you believe that QuoteWerks did not correctly detect the settings, you may change the settings.
Import a file using a previously saved template
There is an option to load the wizard with settings from a template that was previously created. After loading a template, you will only need to advance through the wizard to the Start Import screen and click on the [Start Import] button and the import process will begin using the settings from the template.
Step 2: Determining the field mappings
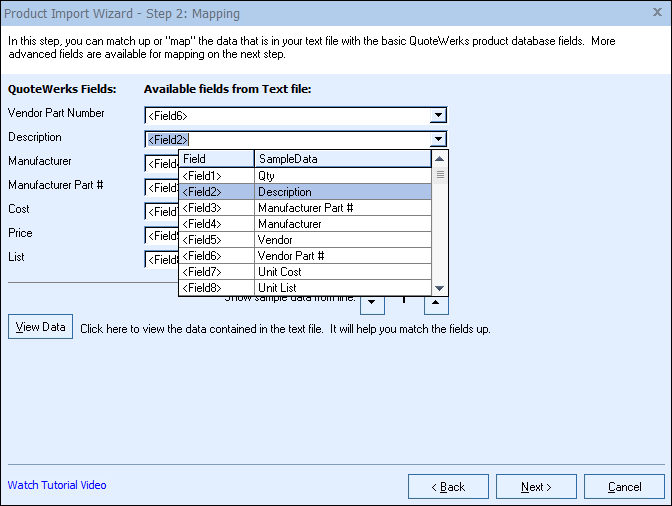
On this step, you will tell QuoteWerks how the columns of data in the text file will match up with the fields in QuoteWerks that are used to track part numbers, prices, etc.
For example, click on the list box next to the “Vendor Part Number” label to select which column of data in the text file should be placed into the “Vendor Part Number” field in QuoteWerks.
When you click on the drop down list box, you will notice sample data from the text file next to each column number. This is provided to help you determine which text column you will want to import the data from for this field. QuoteWerks samples the first 20 rows of data in the text file. Use the up and down arrows on this window to change the row used for sample data that shows up next to the column number.
|

|

Step 3: Advanced Settings
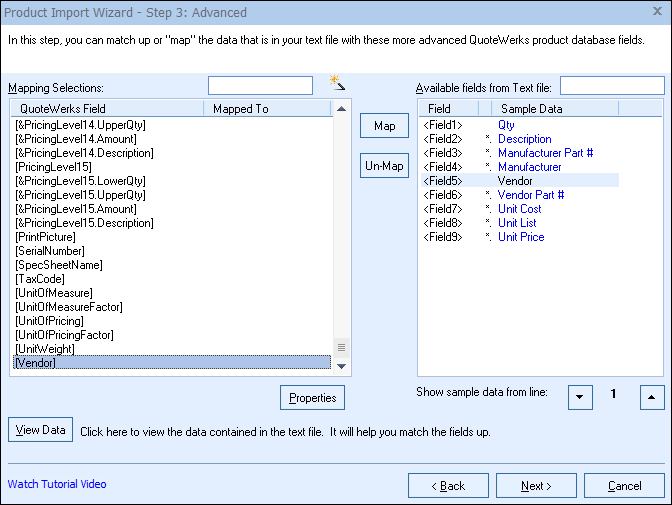
On this step, the wizard will allow you to “map” some of the more advanced data fields that QuoteWerks uses. Only advanced users will need to map these fields. Choose a QuoteWerks field from the list on the left, then choose a matching field from the list on the right, then click on the [Map] button to “map” the fields together. Once fields are mapped together, you will see the field number from the text file listed in the “Mapped To” column of the mapping selections list. Once a field from the text file has been mapped, an asterisk symbol will be displayed next to the field, letting you know that you have already mapped that field.
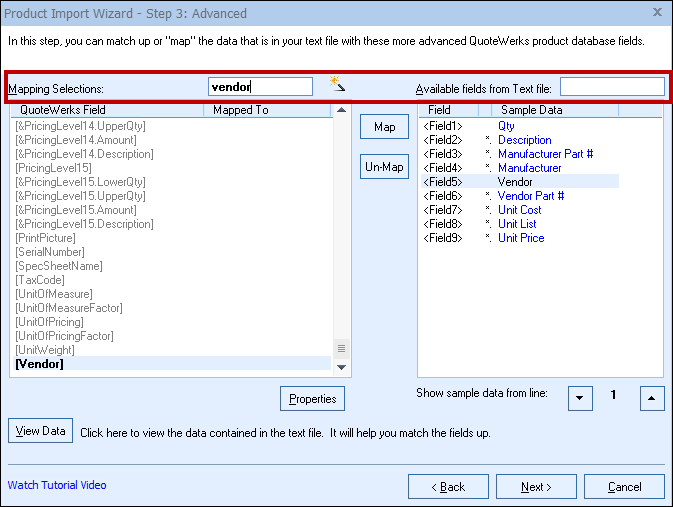
Users can also type the field name in the spotlight search to more easily locate the fields that need to be mapped.
For more information, see Tips on Importing and Mapping Fields.
Advanced Properties
Selecting a QuoteWerks field and then clicking on the [Properties] button will enable you to import a static value or evaluate an expression when importing.
Static Values
You can import a static value into a field for all the products that are imported. For example you may want to set the quantity in stock amount to 15 for all the items you import. To do this, select the [Availability] field from the list on the left, and click on the [Properties] button. Type in “15” (do not include the quote characters).
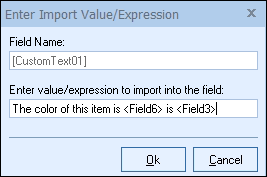
Merging Field Values
When mapping the import fields, you can setup the mapping so that two or more fields from the text file are merged into 1 QuoteWerks field. To do this, select a QuoteWerks field from the list on the left, click on the [Properties] button, and then enter in the fields like “<Field6> <Field3>”. You can also merge in static text like “The color of item <Field6> is <Field3>”. This example illustrates merging two fields, but there is no limit to the number of fields you can include in the mapping.
Step 4: Selecting the Destination
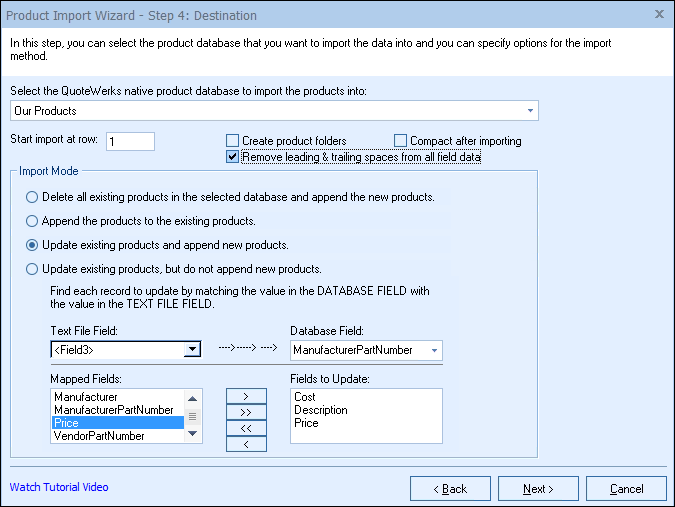
On this step you select the QuoteWerks native product database that will store your imported data. The drop-down list will contain the native product databases that you have created.
|
To have QuoteWerks create a new native product database to store the imported products, select that option from the drop-down list.
Import Mode
Read on to learn about the different import modes.
Delete all existing products in the selected database and append the new products
Select this option to delete all the existing products in the product database before beginning the import of the new products. This feature is used when you receive a product database update every month, and you want to remove the old product information, and retain only the newest product information. Keep in mind that if you have made any changes to the products that already exist in the database, deleting them will cause you to lose these changes. If you use the product folder features, the folder information will be lost.
Append the products to the existing products
Select this option to only add the products from the text file into the product database. It does not check to see if the products that you are adding already exist. If the product already exists, you will have duplicates.
Update existing products and append new products
Select this option to update products that already exist in the database, and add the products that it does not find in the database. Select the column in the text file, and the database field that should be used to identify the matching products. You can also select which of the mapped fields you would like to update. This allows you to update only the price for example of existing products, for products that do not exist, they will be added, and all of their fields will be updated. This mode is particularly useful in cases where you have received a list from a manufacturer that contains all 6000 of their products and pricing. You have previously imported all 6000 of these products into your QuoteWerks product database. Now, 3 months later the manufacturer provides you with an updated list of their products and pricing and now they offer 6500 products. Using this feature, you can update the prices of the existing 6000 products in your QuoteWerks product database and you can add the 500 new products now contained in the update manufacturer price list.
Update existing products, but do not append new products
Select this option to update products that already exist in the database. If a product does not exist in the database, then do not add it. Select the column in the text file, and the database field that should be used to identify the matching products. You can also select which of the mapped fields you would like to update. This allows you to (for example) update only the price field of existing products. This mode is particularly useful in cases where you may receive a list from a manufacturer that contains all 6000 of their products and pricing. However you may only sell 1000 of their products and therefore you only have these 1000 products listed in your QuoteWerks product database. Using this feature, you can update the prices of your 1000 products.
Start Import at Row
Often, the first row of data in delimited text files contains the column titles of the data that is contained in these columns. Using this “Start at Row” feature, you can instruct QuoteWerks to only import data starting at for example the second row since the second row will actually be the first row that contains data.
Create product folders
If you have mapped to the &FolderName field and you choose this option, QuoteWerks will create the folder contained in the &FolderName data if the folder does not already exist. Without this feature, you need to manually create the folders and folder trees before you can run an import. See the “Things to know about importing” topic for details on &FolderName.
Remove leading & trailing spaces from all field data
When importing data exported from older database systems the data is often “padded” with space characters at the end of the actual data value. You can use this option to “trim” or remove these extra spaces.
Compact after importing (Access Only)
If this option is checked, the product database will be compacted after the import process has finished. Compacting is necessary for several reasons. When records are deleted from a Microsoft Access database, they are not actually physically removed; they are only marked as deleted. If you were to repeatedly delete and then import information, the actual database file will continue to grow each time, and your performance will begin to degrade. Also, compacting a database optimizes the order of the items in the database, and eliminates the fragmentation in your database when writing it back to your hard drive. It is recommended to use the compact feature every time you import.
Note: Before the compact process begins, it makes a backup copy of your database with the same base name followed by a numerical sequence for the extension. (Example: PRODUCTS.B01). QuoteWerks increments this sequence each time you do a compact, so the backup file that was just created has the highest numerical sequence. If during the compacting an error occurs, you can retrieve your database by renaming the PRODUCTS.B01 file to PRODUCTS.MDB. |
Step 5: Finished
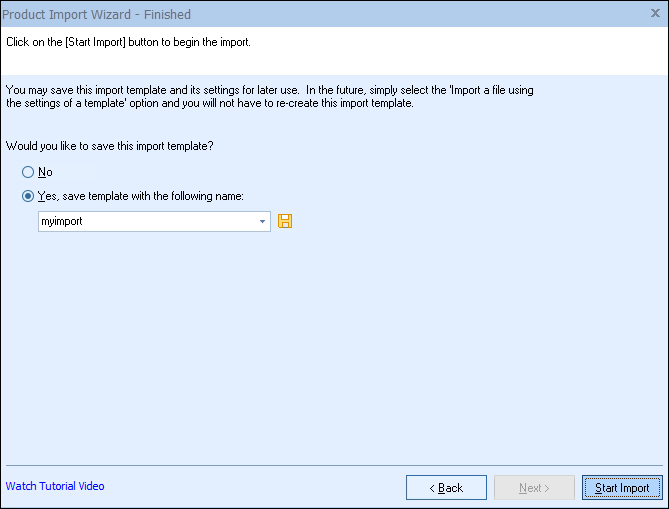
Saving an Import Template
After you have entered all the settings into the import wizard, you may want to save these settings to a template so that the next time you run this import, you can load the import settings from the import template, rather than having to re-choose all the settings again.
On this step, choose Yes, save template with the following name and enter in a name for the template.
|
Start Import
Click on the [Start Import] button, and QuoteWerks will begin importing the products.
Note: Before the import process begins, makes a backup copy of your database. If you have the Access backend, QuoteWerks makes a backup copy of your database with the same base name followed by a numerical sequence for the extension. (Example: PRODUCTS.B01). QuoteWerks increments this sequence each time you do an import, so the backup file most recently created has the highest numerical sequence. If during the import an error occurs, you can retrieve your database by renaming the PRODUCTS.B01 file to PRODUCTS.MDB. If you have the SQL backend, QuoteWerks makes a backup copy of your product tables as a tab delimited text file in the \QuoteWerks\Backups\<date of import> folder with the same base name as the product database SQL table name like "Products_OurProducts" and and the time in UTC 24 hour format, then will end in a .bxx file extension if there are less than 125,000 records. (Example: Products_OurProducts.B01) This automatic backup is not a replacement for proper full SQL database backups, but rather an extra resource in case accidental changes are applied to a product database. |
It performs the import in 3 stages: deleting the records, importing the new ones, and compacting the database.
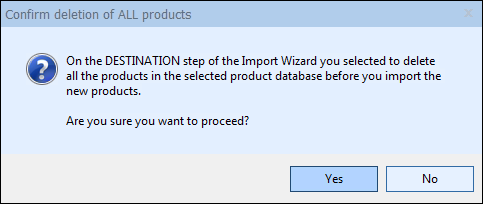
The “Confirm deletion” window will appear. This window will confirm your decision to delete all the existing products in the selected product database that you chose on the DESTINATION step of the Import Wizard.
Next, the “Enter Vendor Name for Product Database” window may appear.

This window will only appear if you selected “Have QuoteWerks create a new database to put the products into” from the DESTINATION step of the Product Import Wizard.
Enter the name of the vendor whose products you will be storing in this database. This vendor name will be used to refer to the database when looking up products in the Product Lookup window. Click on the [Ok] button to move to the next step.
|
Enter the database file name you would like to use to store this vendors products. The database name will be the name of the database file that will be saved to the QuoteWerks directory. Example; vendor name “QuoteWerks” will become “QuoteWerks.mdb” in the QuoteWerks directory.
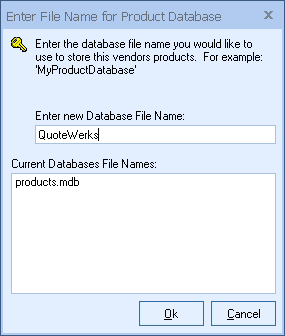
If you are using the Corporate Edition of QuoteWerks, this step will prompt you to “Enter a Name for SQL Product table.” This will be the name of the Vendor’s product list in the QuoteWerks SQL database.
Click on [Ok] complete the QuoteWerks Native Product Database setup. Once you click on the [Ok] button, QuoteWerks will display an import gauge for you to watch the progress of the import.

|
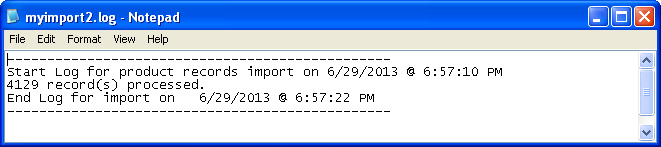
After the import has completed, you will be asked if you would like to view the Import Log File for errors.
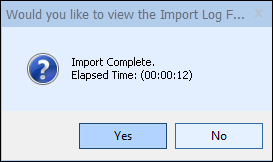
We recommend that you view the log. In the log, the start time, number of records processed, errors encountered, and the stop time will be listed. If you click on the [Yes] button, QuoteWerks will launch the Import Log file. The text file will display the results of the import.
|